The Ultimate Guide to Setting Up Your Lathe Cutting Tool: Tips and Tricks for Perfect Cuts Every Time
Hey there! If you’re a beginner in using a lathe and you’re looking for learning the setup of the lathe machine, here is the easiest guide to that. I’ll explain the setup in very simple 6 steps. These are the most basic steps, explained with the deepest details. I have also included some basic info about the lathe and its tools. So, get your tools out, and let’s get started…
Understanding the Lathe Cutting Tool
So, A lathe is a tool that effortlessly bends metal components into a wide range of shapes. A lathe typically has a wide range of functions at its disposal. These include drilling, grooving, lightning, facing, and so forth. Not only that, but also sewing, metalwork, heat spray, rimming, taper turning, and metal spinning.
The linearly moving cutting edge of the non-rotary tool bit is utilized to remove materials from the workpiece. The turning cutting tool or cutter is a single-point tool that is typically held in a fixed position on a lathe with the workpiece rotating around a turning axis. The lathe cutting tool primarily consists of interchangeable inserts, seats, screws, clamps, and holders. The insert, which uses a highly developed composite structure and coatings to achieve high accuracy in CNC turning, completes the majority of turning operations.
Types of Lathe Cutting Tools
There are various types of cutting tools that are used in lathes for several different purposes. Let’s understand them before heading towards the setup. You need to choose your tools before the process according to your needs.
- Turning Tools: Turning tools are made to remove materials from stock; a rough turning tool is used to remove the most material possible, and a finishing turning tool is used to achieve a good surface quality by removing the least amount of material possible while still improving the accuracy of the piece.
- Boring Bar: A boring bar is necessary when you want to enlarge a hole that already exists since it can easily bore into the existing hole and increase its diameter. It may swiftly widen the hole and process it to the right size for correctly fitting additional components.
- Chamfering Tool: A chamfer is a bevel-like transitional edge between two faces of an object. The part is given a bevel or furrow using the chamfering tool. Sharp or dangerous edges on a workpiece can be smoothed with the help of a chamfer.
- Knurling Tool: Knurling tools are used to make knurled lathe parts by forming or pressing a pattern onto a round piece that serves as a handle’s grip and is typically made on fasteners like nuts. A knurling tool is made with a particular pattern in mind.
- Parting Tool: A parting tool is a narrow-bladed tool that is produced in a variety of shapes and sizes and is used for cutting off sections of the main body of stock being machined, turning, or planing.
- Thread Cutting Tool: Threads on lathe parts are cut using thread cutting tools. In internal thread cutting, the component is held in a chuck, and the tool goes across the part linearly, chipping the workpiece with each pass. The piece can be held in a chuck or mounted between two centers for external thread cutting.
- Facing Tool: During the facing operation on the lathe, a facing tool is used to cut flat surfaces perpendicular to the piece’s rotational axis. The tool is mounted into a tool holder that rests on the lathe’s carriage, and it will feed perpendicularly across the rotational axis of the part throughout the process.
- Grooving Tool: A grooving tool is typically a carbide insert mounted in a specialized tool holder. It is designed to be an insert with numerous tips and is frequently machined to the dimensions and shape necessary for a certain purpose, such as cutting a slot and completing other tasks.
- Forming Tool: When used in the lathe, forming tools are made flat or circular in shape. Cutting edges of basic shaping tools are shaped to fit the groove, undercut, or thread being cut.
- Square Shoulder Turning Tool: Also known as a facing tool or knife-edge turning tool. A straight turning tool with a side cutting edge angle and zero nose radius can be used to turn a beveled shoulder. A straight turning tool with a nose radius that matches the work’s fillet radius is used to turn a filleted shoulder.
- Tool for Counterboring: A standard boring tool can be used to execute the counterboring procedure. The cutting edge of the tool is so finely ground that after rotating, it may leave a shoulder. Commonly used is a counterbore with numerous cutting edges.
- Undercutting Tool: An undercutting tool, also known as a groover, features a point and a cutting edge that perfectly match the shape of the desired groove. Every side of the tool has a clearance angle. For the recessing groove cutting edge, the longitudinal feed is applied. The front clearance angle is influenced by the work’s bore.
Steps For Setting Up a Lathe Cutting Tool
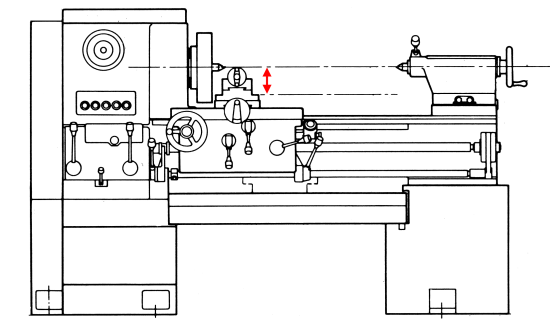
The machine must align the turning tool’s height with the centerline in order to set up the lathe. Setting up a cutting tool for a lathe is not difficult. You will complete your assignment successfully if you carefully adhere to the next few stages.
To understand and utilize the information, one only requires skills. Your equipment, surface finish, and skill life all play a role. In the section after this, you will learn the methods for setting up the equipment.
Follow these 6 simple steps to set up a lathe cutting tool
Step 1
Turn off the lathe machine and get a basic metal ruler ready. Set the tool holder or tool message perpendicular to the component and securely attach a cutting tool to it.
This machine can grind and cut quite a bit. Therefore, the first thing to keep in mind is to safeguard yourself or the operator from any severe injuries. To protect yourself from any unforeseen accidents, all actions must be finished with the lead disconnected. No mind ought to function without being aware of the machine. You run the risk of getting into an accident.
Step 2
To center the spinning component, load the cylindrical component into the chuck of a lathe, tighten the chuck, and then lightly move the part with your hand until you can no longer rotate it.
The steel must be cut by the machine controller so that the top and bottom of the centerline are both the same length. Different cutting instruments are available. You must choose your cutting tools based on your needs. If not, you run the risk of getting into an accident. However, your 6-inch scale is more frequently utilized. This evaluation is essential. If the ratio is incorrect, you will have to deal with problems in the future.
Step 3
Use the cross-feed wheel to bring the tool toward the lathe component while positioning the lathe carriage close to the chuck end. Firmly compress the leader between the cutter and the part’s surface.
Arrange the protruding spindle that does not extend more than 3 inches next to the tailstock if your workpiece matches the calculation table. Set the tailstock lever now. The tailstock should be moved until it is at the opposite back end of the workpiece.
Secure the tailstock clamp with caution. Once the workpiece has been loaded into the lathe, carefully set the sheet down so that it won’t move. But you can take off the centre if you can’t do it properly. and is able to change the surface and clean it.
Step 4
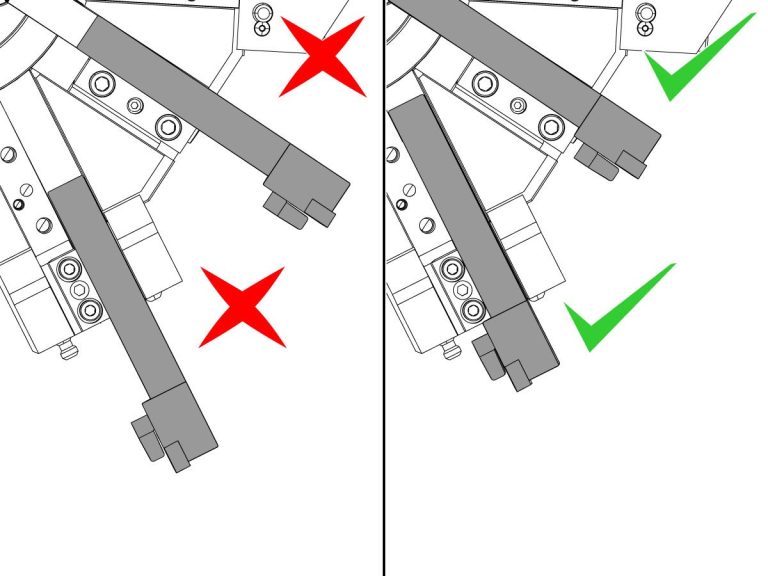
If the ruler is vertical, the device elevation is correctly set; however, you must secure the setting by tightening the securing nut on the readjusting knurled wheel. If the ruler is tilted to the right or left, the cutter is set too high or too low, and the lathe cutting tool’s design is not in line with the center of the component. To get the tool article at the ideal height, depress the tool article cam and turn the height wheel.
They are used to transport borrowed lathes. To avoid a faulty setup, clean the container first, then tighten the nuts. Ensure that the tool is close to the holding.
The ruler must initially be positioned in the middle of the stock and the machinery. The carrier should remain vertical while the equipment is kept in the middle. The ruler will therefore continue to dangle downward and forward. And the tool will reach new heights when the regime regresses. The agency has to be repaired right now.
Step 5
Remove the cutter and reinstall it longitudinally along the lathe axis. Make the first test cut to see if the tool is positioned correctly. If the tool is not exactly in the center position, a little nib will be seen on the component instead of the smooth straight cut those results from the proper configuration.
In order to make a flawless face cut, the setup must be cut for accurate and exact face cutting.
Step 6
If you need to rotate a part along the axis, remove the tool and set it up again perpendicular to the part. Do this for each turning cutting tool that you are getting ready to use to turn a part or modify a tool.
You can set up your lathe cutting tool if you can complete the procedures in order. By cutting in this manner, you can complete your work. If your task is not finished, you must remove the device and fix it once more.
However, the setup will now save every setting that was previously made. Therefore, the identical procedure must be carried out again for each instrument. To use the portion you had planned, roll it out. When using the tool in different containers, only one set can be discarded. Additionally, you can continue using the same procedure if you decide to switch out any equipment.
Precautions While Handling a Lathe Cutting Tool
There are also some safety concerns. During the installation, you must exercise caution. You risk harming yourself if you don’t.
- The lathe must be turned off while completing all of the setup procedures. Ensure there is no danger of the machine going on by accident.
- To manage, you need previous experience. If not, your lack of experience makes an accident possible at any time.
- You can group the tools together and position them at the proper height to handle many containers to save time. But refraining from doing it in the first place will suffice. Both the gadget and the packaging need to be kept tidy. This will make the job easier. Therefore, you must engage in the event as a whole while keeping the switch off.
- Always use the suitable size work and tool holding device to clamp the work and tool correctly.
- Always keep all tools away from the machine.
- Before knowing the correct process, one should not operate the lathe.
- When using a machine, the work should be checked periodically.
- To ensure there is no chance of the work hitting any element of the lathe, one should manually inspect the face-plate or chuck.
- Before using a machine, one should always confirm that all guards are in place.
Conclusion
Setting up a lathe is not a demanding or difficult task. The most important thing is to stick with and implement the appropriate plan. But you need to exercise caution. If you do something or don’t take any measures, you could get hurt.
Once you have a general understanding of the job, you will be able to use the tools when you examine the procedures. You can achieve your goals in this way. The object you plan to reshape can be built. You will be able to set up a lathe cutting tool in this manner.

Hi, my name is Charles Winn, A DIY enthusiast, Mechanical Engineer. I was born and raised in Springfield, Missouri. I am also a father of two troublemaker kids, a terrible photographer, and I love to play chess.